Image Map
Showing posts with label Recipe. Show all posts

Tuesday, April 21, 2015

Tequila Lime Shrimp Stir-Fry


The other night I adapted two Pioneer Woman recipes into one and you guys, the outcome was out of this world!  Seriously, Derek and I commented how this recipe was now a favorite in the house.  And healthy too.

First, you want to marinate the shrimp with her Tequila Lime recipe:
-Juice from 4 limes
-1 cup tequila
-1/4 cup olive oil
-2 teaspoons kosher salt
-1 jalapeno sliced
-1/2 bunch chopped fresh cilantro

-2 pounds whole jumbo shrimp (peeled and deveined)

Put all the marinade ingredients into a food processor/blender.  Combine the shrimp and marinade into a sealed bag and let sit in the fridge for several hours (at least 5).

Stir-Fry Ingredients:
-Butter/olive oil
-4 cloves garlic minced
-2 whole zucchini sliced
-2 ears of corn, kernels sliced off
-1/2 cup grape tomatoes sliced in half lengthwise
-1/2 bell pepper
-1 cup of Monterey jack cheese (optional)
-Salt and pepper

Directions:
1) Heat butter or olive oil in a large skillet over medium/high heat
2) Add minced garlic
3) Add shrimp and season with salt
4) Cook for 3 minutes or until shrimp becomes slightly opaque (I used medium heat here as the recipe suggested; however, next time I'll definitely use a higher heat to get more of a golden crisp on the outside of the shrimp)
5) Remove shrimp to a plate
6) Using the same skillet and adding butter/olive oil if needed, add zucchini slices in a single layer and cook for one minute, turning once
7) Move zucchini to the edges of the pan and add corn kernels to the middle of the plan.  Cook for one minute.
8) Add grape tomatoes and bell pepper.  Salt and pepper the veggies and toss around
9) Add shrimp and cook for an additional 30 seconds.
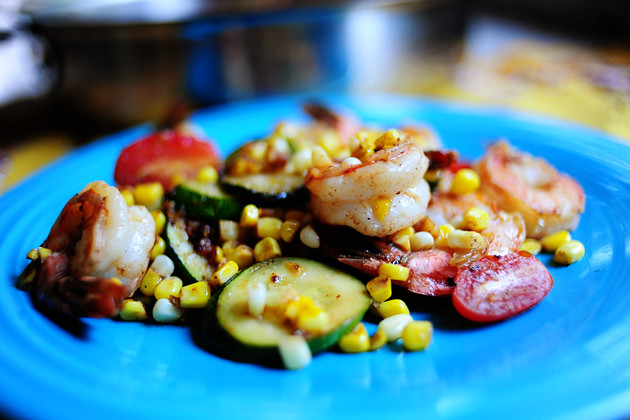
10) Lastly, sprinkle cheese over stir-fry (if using) and Enjoy

We served ours over a bed of rice and it was absolutely delicious.  Cannot wait to make it again!

Thursday, March 26, 2015

Recipe: Chicken Wild Rice Casserole

I've got a super yummy casserole for you to make!  We don't make many casseroles in our house; but, you know those days when all you want is something warm, easy, and comforting, well this is a perfect recipe! Plus- Charlie loved it so that is always a keeper for me.  PLUS PLUS- it tastes excellent heated up the next day!


Original recipe from Pinch of Yum

Ingredients:
1 onion
5 carrots
5 stalks celery
1 cup wild rice
3 cups chicken broth
1 lb. chicken breasts, cut into small pieces
10 tablespoons butter (divided)
1 teaspoon salt
½ teaspoon poultry seasoning
4 tablespoons flour
2 cups milk

3-4 cups cubed bread (dry, sturdy, or day old bread works best)

Directions:
1) Preheat the oven to 350 degrees. Chop the onion, carrots, and celery. Place in a large baking dish. Add the wild rice and the broth and salt & pepper. Cover tightly with foil. Bake for 1 hour 15 minutes.

2) When the rice is almost done, melt four tablespoons butter in a small saucepan over medium heat. Add the flour, salt, and poultry seasoning and cook for one minute. Add the milk slowly, whisking to form a thick, creamy sauce.

3) If you want the topping, melt the remaining six tablespoons butter and toss with the bread cubes. (note from original recipe- I've also made it without the topping and it's still delicious).


4) When the rice is done, remove foil, add raw chicken and creamy sauce, and stir to combine. Arrange the bread in a layer on top. Turn the heat up to 450 and bake uncovered for another 15-20 minutes until chicken is no longer pink and the bread cubes are golden brown.

Enjoy!

Friday, November 21, 2014

Minestrone Soup & Cornbread Recipe

I have two delicious recipes for you today.  The soup will be added to my winter soup rotation.  It is probably the best minestrone soup I've ever had.  I love all the veggies in it and couldn't get enough!  The cornbread recipe is super easy and turned out delicious.  Both of the recipes can be found from here.


7 Vegetable Minestrone Soup (via crockpot)

Ingredients

1 medium yellow onion
2 teaspoons minced garlic
2 medium yellow squash, chopped
2 medium zucchini, chopped
2 medium carrots, chopped
2 teaspoons fresh oregano, chopped 
1 - 15.25 oz. can whole kernel sweet white corn, drained
1 28 oz can crushed tomatoes
4 cups chicken broth
1 - 15.5 oz. can Great Northern beans, rinsed & drained
1 package Hidden Valley Ranch Dressing
2 teaspoons hot sauce

1 cup uncooked ditalini pasta
1 - 6 oz. bag of fresh baby spinach
Salt & Pepper to taste
Shredded Parmesan Cheese for topping

Directions
1. Saute vegetables over medium-high heat with some oil until tender
2. Salt and pepper veggies
3. Put veggies and the rest of ingredients in a crock pot (except pasta, spinach, and cheese)
4. Cook on low for 4-6 hours
5. 20 minutes before you are ready to eat, put pasta in the crock pot to cook
6. When ready, turn off crock pot and put in the spinach and salt & pepper
7. Pour into bowl and top with shredded parmesan cheese


The Best Cornbread | Cooking Classy
 via

Cornbread

Ingredients
2 packages Jiffy cornbread mix
3 eggs beaten
1 8 oz sour cream
1 stick of butter
1 14 oz can creamed corn
 
Directions
1. Melt butter in 9x12 dish at 350 degrees
2. Mix other ingredients and pour in pan
3. Bake 30-40 minutes 


Monday, October 20, 2014

Chicken Pot Pie Recipe


I love chicken pot pie!  Like, a lot.  Derek on the other hand...he could leave it.  But, it is still a staple in our house because let's face it, I do the cooking. 

We have tried lots of pot pie recipes and I feel like I have perfected it.  However, adding the lattice crust elevates this recipe to a new level!  The original recipe can be found here.

Ingredients
4 tablespoons butter
1/4 cup onion, chopped
1/4 cup celery, chopped
1/4 cup carrot, chopped
1/4 teaspoon salt
2 tablespoons flour
2 cups milk
1/2 cup heavy cream
1 teaspoon "Better Than Bullion" chicken base
2 cups chicken, cooked and chopped
1/2 cup frozen peas
1/2 teaspoon fresh thyme plus more for garnish if desired
1-2 sheet frozen puff pastry
More butter for brushing on top


Directions
-Allow puff pastry to thaw at room temperature and then gently unfold

  1. -In a large pot, melt butter over medium high heat
  1. -Add onion, celery, carrot, and salt and sauté until onions are translucent and vegetables start to get tender
  1. -Sprinkle flour over vegetables and cook for 1-2 minutes
  1. -Gradually whisk in milk, heavy cream and and Better Than Bullion, and bring to a slow boil
  1. -Simmer gently over medium heat until sauce begins to thicken (5 minutes)
  1. -Turn heat to low, and add chicken, peas and thyme
  1. -Preheat oven to 400 degrees
  1. -Pour chicken mixture into a 9 x 13 baking dish
  1. -Cut puff pastry into strips that will fit horizontal and length equal to the baking dish
  1. -Lay puff pastry strips over chicken mixture, weaving it together to form a lattice pattern (I used this tutorial)
  1. -Using a pastry brush, brush butter onto the top of the puff pastry
  1. -Bake for 40-45 minutes until the puff pastry is a deep golden brown color
  1. -Cool for 5 minutes before serving
Enjoy!


Tuesday, August 26, 2014

Recipe: {Almost} Naked Salmon Burger with Sriracha Mayo

I have THE best recipe for you guys today.  Seriously, the spicy arugula, crunchy ciabatta bread, flavorful salmon burger, spicy sriracha mayo, and creamy avocado all together in one single bite....yum!!  This may be my favorite new recipe to make.


Recipe adapted from here

Ingredients:
  • 3 tbsp mayo
  • 1 tbsp Sriracha
  • 2 Fresh ciabatta rolls cut in half
  • 1/4 cup diced yellow bell pepper
  • 1/4 cup diced red bell pepper
  • 7 tbsp panko 
  • 1 minced clove garlic
  • 1lb wild salmon fillet 
  • 1 large egg, lightly beaten
  • 1/2 tbsp soy sauce
  • 1 tsp fresh lemon juice
  • 1/4 tsp kosher salt
  • Olive Oil
  • 2 cups baby arugula
  • 4 oz. avocado

 Directions
  1. Combine mayonnaise and sriracha, set aside.
  2. Remove the skin from the salmon, and cut about a 4 oz piece off. Place in a food processor or chopper to finely chop. This will help hold the burgers together.  With a knife finely chop the remaining salmon.
  3. In a medium bowl combine the salmon with the bell peppers, panko and garlic.
  4. In a small bowl, combine egg, soy sauce, lemon juice, and salt; add to salmon mixture, tossing gently to combine. Form mixture into 4 patties and refrigerate at least one hour, this will help the burgers become firm and hold together during cooking. 
  5. Lightly coat a grill pan or skillet with olive oil. Place over medium-high heat until hot. Cook the patties 4 to 5 minutes per side, or until cooked through.
  6. Place half of ciabatta roll on each plate.  Top with argula, salmon burger, 1 tbsp of mayo, and then avocado slices 

Monday, September 23, 2013

Weekend Recap & Recipe

Well, fall is officially here.  And the weather this weekend definitely showed that….I’m not mad about it.

Friday, Derek and I went to Cincinnati’s Oktoberfest.  If you remember, this is something we try and go to every year.  Even though I could not participate in the bratwursts or beers, I was really looking forward to this!  Derek and I always have such a good time.  Well, this year Mother Nature decided to rain all night.  And when I say rain, I mean POUR!  We didn’t bring an umbrella and got completely soaked.  COMPLETELY! 

Because of the rain, I didn’t get many pictures.  However, Derek managed to snag a photo of our dessert right before we left…funnel cake.  I mean, who doesn’t love funnel cakes?!

photo 12

Even though it rained, it will definitely be the most memorable Okotberfest for us.  The streets were pretty much dead due to the rain so we had our pick of every food we could want, no lines, and ability to sit and listen to all the German music.  We didn’t care that we were soaking wet :)


Saturday morning, I spent getting our house ready for fall.  Honestly, I should have enlisted Derek in carrying everything up from the basement for me (he was working Saturday).  I understand when they say “breathing for two” because man, those trips up and down the stairs got me good!  Anyway, I was thinking the entire time that when I would be putting these things away, we would have a little girl at home!!!  So exciting.

photo 9

A new addition this year is the “thankful” burlap banner I ordered from the Etsy shop funkyshique.  I just love the orange polka dots for Halloween and the glittered thankful for Thanksgiving.  I can keep this bad boy up for a while!

photo 10

Added my Holiday Apothecary Jars to the island.

photo 11

And decorated our outside with the Ohio State pumpkin, polka dot pumpkin, and glittered Boo topiary.

Saturday evening, we had our first installment of dinner club!  2 other couples, including Sarah and her husband, and Derek & I have decided that once a month we would take turns hosting a dinner club.  This month, the meal was at Emily’s house.  We had a delicious Italian meal.  Can’t wait to keep this going!


Now, I completely forgot to post this recipe last week, but I have a super fabulous and easy dessert for you!


No Bake Key Lime Cheesecakes (recipe adapted from Delish)
Ingredients:
Crust
  • 3/4 cup graham cracker crumbs
  • 4 tablespoons (unsalted) butter, melted
Filling
  • 8 ounces cream cheese, softened
  • 1 can (14-oz.) sweetened condensed milk
  • 1/2 cups (bottled) key lime or regular lime juice
  • 1 container (8-oz.) frozen whipped topping, thawed
  • 1 teaspoon lime zest
  • lime slices and/or lime zest, for garnish, optional
Directions
  1. Line 12 cupcake cups with foil liners. Stir graham cracker crumbs (I would use food processor to get the crumbs very fine) and melted butter together in a bowl to combine. Spoon 1 Tbsp. of the mixture into each liner, pressing it down to make the crust.
  2. With an electric mixer on low speed, beat the cream cheese in a large bowl until creamy, about 30 seconds. Add the condensed milk and lime juice, and blend on medium speed until just combined, 20 to 30 seconds. Add 1 cup of the whipped topping and lime zest and blend on low speed for 15 seconds longer.
  3. Spoon mixture evenly into liners. Cover pan with plastic and freeze until firm, at least 3 hours. Remove from freezer 15 minutes before serving; peel off liners and dollop 1 Tbsp. remaining whipped topping on each cake. Garnish with lime slices, if you like.
Try it!  It is pretty much amazing.  Such a refreshing dessert!


Hope you had a great weekend!

Monday, August 12, 2013

Working in the Nursery & Recipe

Hello there Monday!  How was everybody’s weekend?  Derek was working all weekend so I knew I wanted to spend majority of my time in the nursery.  I washed all the little lady’s clothes, put them away/hung them up, organized drawers, etc. etc.  Not too much left to do in the room!  I’m so excited to do an unveiling of the room for all of you!

I had dinner on the table for when Derek got home from work last night….I tried a new dessert recipe that has been in my queue forever and wanted to share with all of you!

Banana Bread Bars with Brown Butter Frosting

Oh my, these are delicious!  I was so excited when we finally had some ripe bananas.  Usually we go through these suckers before they become ripe enough for things like banana bread.  I knew once we had 3 or 4 available, I wanted to make this recipe.  It is pretty dense (I think I would bake it in a deeper pan next time) but seriously delicious.  Enjoy!


Original Recipe from here

Ingredients
    Banana Bread Bars:
  • 1 ½ cups sugar
  • 1 cup sour cream
  • ½ cup butter, softened
  • 2 eggs
  • 1 ¾ cups (3 or 4) ripe bananas, mashed
  • 2 teaspoons vanilla
  • 2 cups flour
  • 1 teaspoon baking soda
  • ¾ teaspoon salt
  • ½ cup chopped walnuts (optional) Browned Butter Frosting:
  • ½ cup butter
  • 4 cups powdered sugar
  • 1 ½ teaspoons vanilla
  • about 3 tablespoons milk or half and half
Instructions
  1. Heat oven to 375 degrees.
  2. Grease and flour 10x15 jelly roll pan or line with parchment paper (for thicker bars use a 9x13 pan).
  3. Beat first four ingredients until creamy.
  4. Blend in bananas and vanilla for one minute.
  5. Add dry ingredients and blend for one minute.
  6. Stir in nuts and spread in pan.
  7. Bake 20 to 25 minutes until golden brown.
  8. Cool slighty until warm but not hot and frost with Browned Butter Frosting (recipe below).
  9. For the Browned Butter Frosting: Heat butter in saucepan over medium heat past the melting point until it is boiling and a delicate brown.
  10. Remove from the heat and immediately add the remaining ingredients.
  11. This should be thicker than a glaze and thinner than frosting.
  12. Using a spatula smooth over the top immediately.
  13. The frosting will be easier to spread once it's on the warm bread.

Oh, PS- I have my glucose test this week so please wish me luck!


post signature

Friday, July 19, 2013

Friday Random & Recipe

Yay for Friday!  So, I originally wanted to post my 24 week bump update today, but I’m lazy and did not get to taking a picture/do the chalkboard thing.  BUT, I promise it will come next week!
-I can’t believe I’m 24 weeks.  Only a few more weeks until I enter the 3rd and final trimester!
-We have received a crap ton of deliveries (I’m not mad about it) for the nursery.  SOOOO excited to get the little gal’s room fixed up.
-Speaking of deliveries, we had a company deliver some furniture this week and they proceeded to run over our mailbox.  As in completely ruin it.  Right now we cannot receive mail.  Such a pain in the butt!
-We ran out of Brutus’ food the other morning so I had to give him biscuits/treats for breakfast.  I put about 5 biscuits in his bowl and the little guy couldn’t believe his luck.  Seriously he pranced around the house a couple of times before digging in because he couldn’t believe I was giving him treats for breakfast!!
-We rented Safe Haven the other night and I was disappointed.  It was pretty slow and I didn’t love the actors.  I didn’t think there was any chemistry!
-My birthday is Sunday so we have a busy weekend planned.  I hope you all have a great one!
In honor of the birthday week, I made Birthday Cake Chocolate Chip Cookies via the best dessert blog ever!!  These were super yummy and contained everything I love!
photoedit

Ingredients
  • 1 cup butter, room temperature
  • 1 cup dark brown sugar
  • 2 eggs
  • 2 tsp vanilla
  • 1 tsp baking soda
  • 1 tsp salt
  • 1 1/2 cups cake mix
  • 1 1/2 cups flour
  • 1/2 cup sprinkles
  • 2 cups chocolate chips
  • 2 cups coarsely chopped Birthday Cake Golden Oreos **I used the original golden Oreos because I could not find the birthday cake
How to Make
  1. In a bowl of your stand mixer cream butter and sugar together for about a minutes until light and fluffy. Add in eggs one at a time.  Add vanilla and beat until smooth.
  2. With mixer on low add in baking soda, salt, flour and cake mix, stirring until mixture just comes together.
  3. With mixer still on low add in sprinkles, chocolate chips, and chopped Oreos. Stir until evenly incorporated.
  4. Chill dough for at least 2 hours, an overnight is better.
  5. When ready to bake preheat oven to 350°
  6. Line baking sheet with parchment paper and form dough into round balls, placing them 2 inches apart on baking sheet.
  7. Bake cookies for 8-10 minutes until edges are slightly golden. **Mine baked for 13 minutes…I must make large cookies!
  8. Allow to cool on baking sheet for 3 minutes and then transfer to wire rack to continue cooling.

Enjoy!

post signature

Tuesday, July 2, 2013

Buffalo Chicken Mac and Cheese

So, I made this Mac & Cheese last week and it was DE-licious!  Seriously, go make this right now.
You find the original recipe here
 Ingredients:
1 lb. pasta { I used the small shells}
3 boneless, skinless chicken breasts, cooked & cubed
1 tbsp. flour
4-6 tbsp. butter
1 1/2 cups milk
4 oz. grated monterrey jack cheese {half a brick.  plus more for topping}
1/3 cup sharply shredded cheddar cheese
1/3 cup buffalo wing sauce  {Frank's Red Hot is my favorite!!!}
1/3 cup Ritz cracker crumbs
Salt and pepper to taste
Ranch dressing, to taste

Directions:
  1. Preheat oven to 375
  2. Cook pasta according to package directions, drain, and return to pot. 
  3. While the pasta is cooking, heat saucepan over medium heat and add the butter.  Add the flour once the butter is melted and bubbly.  Whisk together to create a little roux and then cook for about 1-2 minutes until it starts to get a little golden in color.
  4. Add in the milk and turn the heat down to low. 
  5. Stir until the milk thickens and add in the cheeses.  Stir until the mixture is smooth.
  6. Stir in wing sauce and salt and pepper to taste.
  7. Lightly grease a 9x13 baking dish and add the pasta & cubed chicken.  Mix well so that the chicken is evenly distributed throughout the pasta. 
  8. Pour cheese sauce on top and make sure everything's evenly coated for maximum yumminess.
  9. Now sprinkle with cracker crumbs and extra cheese.
  10. Bake at 375 for about 25 minutes or until cheese is golden brown.  Remove from oven and drizzle with extra wing sauce.  Once plated, add blue cheese or ranch dressing if you prefer!

Note- I would double the sauce next time.

Enjoy!

post signature

Wednesday, April 10, 2013

Product Reviews & Recipe

I’ve bought some products recently and thought I would let you know how I like them.  Ohhh and a few of you asked for the cinnamon sugar banana bread recipe.  Good news, it is so incredibly tasty that I HAD to share!
Product Reviewedit

1. Clinique Moisture Surge Intense- I have pretty dry skin.  I’ve been using this at night after I wash my face and I’ve noticed a huge difference!!  This is a definite keeper.

2. Benefit Cosmetics Watt's Up!- My friend Emily was wearing this highlighter one day and it looked amazing on her.  After asking what she was wearing, I knew I had to go buy it!  It is the perfect champagne highlighter and gives a great little “glow!”

3. L'Oreal Everstyle Smooth and Shine Crème- I’m slowly replacing all my hair products with drugstore products.  After hearing your rave reviews on the new L’Oreal products, I picked up this smooth & shine cream to use when wearing my hair straight.  Definitely as good as the bumble & bumble stuff I was using.  This helped smooth my hair without weighing it down.  I will definitely be buying this again!

4. NARS Lipstick - Sexual Healing- I just picked this lipstick up today and I’m already in love.  I went in search of an everyday bronzy-pink lip color.  After looking at 1,203 colors, I settled on this one.  I’m not a lipstick person but I really like how it feels on my lips.

5. MAKE UP FOR EVER HD Invisible Cover Foundation- After hearing all the rave reviews about this foundation, I wanted to give it a try.  Unfortunately, I didn’t find it any better than my current foundation, so I had to take it back.  It’s kinda spendy so it had to be ah-mazing….and it didn’t do anything great for my skin.


That’s all the product reviews I have for you.  Now, on to the yummy(!!!!!) recipe!  This has the perfect crusty/sugary outside and ooey-gooey banana-y inside.

Original recipe from here!

Ingredients
For the bread:
  • 3-4 over-ripe bananas, smashed up
  • 1/3 cup melted butter
  • 3/4 cup sugar
  • 1 egg, beaten
  • 1 tsp vanilla
  • 1 tsp baking soda
  • dash of salt
  • 1 1/2 cups flour
For the swirl:
  • 1/3 cup sugar
  • 1 tbsp cinnamon
Directions
  1. Preheat oven to 350. Butter and four (or spray with non-stick cooking spray) a loaf pan.
  2. Mix bananas, butter, sugar, egg, and vanilla together. sprinkle baking soda and salt around on top of the banana mixture. Then gently stir in flour. Be careful not to over-mix!
  3. In a small dish, mix together the 1/3 cup sugar and 1 Tbsp cinnamon.
  4. Add 1/2 of the batter to the loaf pan and then sprinkle half, or a little more than half of the cinnamon-sugar mixture all over the batter in the pan. Add the rest of the batter, and then sprinkle the leftover cinnamon-sugar on top.
  5. Bake for 35-40 minutes, but remember, if you’re using a different-sized loaf pan, be careful and keep a close eyeball on it! (The original recipe called for 50-60 minutes, so I put my timer on 45 (I like to always bake 5 minutes less).  When the 45 minutes were done, my toothpick came out completely clean so I would have like to take it out probably after 40 minutes.  So, just a heads up!

Let me know if you give it a try.  You won’t be disappointed!


post signature

Tuesday, February 12, 2013

World's Best Chocolate Chip Cookies


I've got a secret for you....I know how to make the World's best chocolate chip cookies.  I'm not even joking!!

You see, all of our friends request that I make these suckers.  In fact, this is what Derek's employees requested for their Christmas gifts (see above).

So, I always joke around that I would never give out the recipe; but, what kind of blogger would I be if I didn't give up this secret.  Right?  Right! 

Now, I promise you I am no expert baker.  And, I may include some common-sense things in the directions.  But, if you follow this recipe, you will have the most amazing cookies.

Ingredients (original recipe found from the back of the Ghiradelli chocolate chip bag)

-1 bag of semi-sweet Ghiradelli chocolate chips (*must be these chocolate chips!)
-2 1/4 cups Flour
-1 tsp Baking Soda
-1/2 tsp Salt
-2 sticks Salted Butter (softened)
-3/4 cup Sugar
-3/4 cup Brown Sugar (packed)
-2 large Eggs
-2 tsp Vanilla
 
Directions

1. Set out butter so it will soften to room temperature (*must do this)

2. Stir flour with baking soda and salt.  Set aside
3. In a large mixing bowl, beat together softened butter, sugar, and brown sugar at medium speed until creamy.
4. Mixing on a low speed, add eggs one at a time until incorporated
5. Add vanilla
6.  Gradually mix in dry mixture (I usually do this in 3 "batches."  Once the first batch of dry mixture is incorporated, I dump in the second part, etc.  *It is very important that the dough is not overmixed!)
7. Stir in bag of chocolate chips
8. Put cookie dough in the fridge and allow to chill for at least 2 hours.  (*Absolutely necessary and I usually do this the night before)

9. Preheat oven to 365 (*I put my oven a little lower than the recipe calls for)
10. Line pan with parchment paper
11. Roll dough into balls.  I bake 10 at a time
12. Bake for 11-13 (max) minutes, depending on the size.  However, do not overbake these.  Even though it may seem like they are undercooked, I promise you they are not!  The edges should be a light golden brown.
13. *Transfer directly to the freezer.  This may be the most important step!!  This stops the baking process and the cookies will be perfect.

14. Depending on how you like your cookies (I like mine at room temperature, Derek loves his a little warm), take your cookies out after 8-10 minutes.
15.  Eat!

I would love to hear from you if you try these.  Let me know if you have any questions!


post signature

Thursday, January 10, 2013

Thin Mint Truffles

First, thank you for all of your comments, texts, and emails yesterday :)

Next, as requested, I have the thin mint truffles recipe for you!  A lot of you requested to have the recipe after I posted the creation on Instagram.  I first learned of this amazing idea from Kristen.  Although I am not a big fan of mint, I thought these looked perfect for Christmas dinner.

The original recipe found here.

DSC_1260e

Ingredients:
  • 1 9oz box Girl Scout Thin Mints (Or Keebler's Grasshopper cookies in my case)
  • 4 oz cream cheese, slightly softened
  • 8 oz green mint chips
  • 8 oz white chocolate chips

Directions:
  1. Crush cookies into fine crumbs in a food processor.
  2. Mix crushed cookies and softened cream cheese in a large bowl until completely combined (your hands work best for this).
  3. Roll into small balls about 1 inch. My balls were a little too large (that’s what he said).  So next time I would concentrate on making them smaller.
  4. Place truffles in the fridge for about 30 minutes.  This makes it a little easier when dipping in the chocolate
  5. Melt the green mint chips in the microwave per the instructions. 
  6. Using a toothpick or two forks, cover half of the truffles in the melted mint chocolate.  Place covered truffles on wax paper.
  7. Melt the white chocolate chips.  This is go at your own risk.  I tried two times to do this in the microwave and ruined 2 bags of white chocolate chips.  I don’t know what was going on because the mint chips melted just fine.  Anyway, thank goodness my husband is amazing and ran to get me a THIRD bag from the store.  Using a makeshift double broiler, I finally got some melted white chocolate!
  8. Repeat step six using half of the truffles in the melted white chocolate.
  9. Put the rest of the melted mint and white chocolate in ziplock bags.  Cut a teeny-tiny hole and decorate your truffles.
  10. Place truffles back in fridge.  Eat when desired! 


post signature

Wednesday, December 12, 2012

Margarita Jello Shot

DSC_1201e

First, a BIG thank you for everybody that linked up yesterday!  You are awesome.  And I loved reading everybody’s posts.  Now, on to the fun!

I wish I would have taken pictures while we prepped these limes, but I didn’t even think of it (I know, right!).  Anyway, the original recipe is from here!

Prep Time: 20 min
Total Time: 4 hrs 45 min
Servings: 40 servings


Ingredients

  • 10 whole limes
  • 1 cup limeade (we used the frozen minute maid limeade)
  • 2 envelopes plain gelatin
  • 3/4 cup tequila
  • 2 tablespoons triple sec
  • 1 tablespoon sweetened lime juice
  • 1 tablespoon kosher salt


Directions

  1. Cut the limes in half lengthwise. Scoop out the insides. (Note- this took forever!  I suggest using a pairing knife and cutting along the edge.  While holding the lime in the palm of your hand, use tablespoon to scoop out the insides.  I spun the lime in my hand while going around-and-around with the spoon.  Hope this makes some sense.
  2. Add the limeade to a saucepan, sprinkle the gelatin over the juice. Let it sit for 2 minutes.
  3. Heat the limeade over low heat, stirring, until the gelatin has dissolved, about 5 minutes.
  4. Stir in the tequila, triple sec, and sweetened lime juice. Pour into the lime halves.
  5. Refrigerate until set, about 4 hours.
  6. Cut the limes into half, sprinkle with salt, and serve.

These were seriously a huge hit of the party!  Honestly, they were a little sour for Derek and my taste.  However, everybody loved them so I would say make them per the recipe.  I have a couple of other recipes similar to this one with different flavors that I cannot wait to try!


post signature

Tuesday, November 13, 2012

Random Tuesday

So I’ve got a lot of things for you today…all completely unrelated.  Thus, the need for bullet points…and I just really like bullet points!

  • Did I tell you all that I’m celebrating my ONE YEAR of no caffeine?  No?  Well, it’s true.  I knew I was straight up addicted to caffeine so I wanted to see if I could do without. Now I feel so much better without it.  Seriously!  I started with cutting coffee out in the mornings.  This wasn’t that bad…the worst part was stopping my diet dr. pepper everyday at lunch.  Man or man, do I miss my ddp!  It is just sooo good.  I’m substituting juice and tea now so that way I don’t have to go through life drinkin just water.  Don’t get me wrong, I love me some water…just not all day every day.


RHW
  • Ok, so can anybody else NOT get into Real Housewives of Atlanta?  I’ve watched every season of Atlanta and for some reason I can't get past 10 minutes of the first episode.  Don’t get me wrong, I’ll probably watch it.  I just don’t know what it is!  On the other hand, I’m so freakin excited and love Beverly Hills!  Get me more of that please!


  • The Vow…hmmm….ididnotlikethebookorthemovie!!!!!!  Did you get all that?  I know so many of you raved about the book but I could not get into it.  Anybody else feel this way?  The movie was just ok for me.  I mean, talk about a completely different story line!  So you would think since I didn’t like the book, that I would like the movie because it was completely different, right?  Wrong.  The only saving grace was two things: Channing & Rachel!  Love!


  • If you are going to make chicken noodle soup (which I suggest you do because it is awesome), please use this recipe!  It was seriously the best!  So flavorful.  My only suggestions is to cook the carrots (maybe even roast them) longer than suggested.  They were a little crunchy.  Maybe that’s your style, but if not, they need to be cooked longer that the recipe suggests.  Also, I let my soup simmer for a long while to let all the flavors meld together; so, I would suggest to add the noodles a bit later into the process so they are not too done.


  • While shopping the other day for my nieces and nephew, I came across Disney Princess Paper Dolls!!!!!  I freaked out in Toys R Us…just ask my husband!  I loved paper dolls when I was younger and these are so much better because they have magnets.  Can’t you just imagine how much longer these will last?


Christmas tree with presents and fireplace with stockings --- Image by © Royalty-Free/Corbis
  • We are traveling for Thanksgiving…as in flying to another state.  Thus, I kinda want to decorate before we leave.  That way, when we get back the house is already decorated.  If we do that, it would have to be soon.  Like tonight soon.  Thoughts?  Will our neighbors think we don’t like Thanksgiving?  Because we do.  Just trying to make it more convenient!


Love (Two red hearts)
  • I heart you ladies!  I really do!  I love all of your comments and emails.  They make my day!  And that’s all that I have for you.


post signature

Wednesday, October 31, 2012

Recipe {& Happy Halloween}

Happy Halloween!!  I don’t know about your neck of the woods, but it’s ccchillly here!  Poor little trick or treaters!  I’ve got a recipe that is sure to warm you up on these cold fall/winter days!  It’s Chili!  We made this recipe and had leftovers all week long!  So good!  The recipe has over 2,700 reviews on Allrecipes, so it has to be great right?

I want to make different types of chili this year….do you have a favorite?

Boilermaker Tailgate Chili (original recipe from here)

Ingredients:
2 pounds ground beef chuck
1 pound bulk Italian sausage
3 (15 ounce) cans chili beans, drained
1 (15 ounce) can chili beans in spicy sauce
2 (28 ounce) cans diced tomatoes with juice
1 (6 ounce) can tomato paste
1 large yellow onion, chopped
3 stalks celery, chopped
1 green bell pepper, seeded and chopped
1 red bell pepper, seeded and chopped
2 green chile peppers, seeded and chopped
1 tablespoon bacon bits
4 cubes beef bouillon
1/2 cup beer
1/4 cup chili powder
1 tablespoon Worcestershire sauce
1 tablespoon minced garlic
1 tablespoon dried oregano
2 teaspoons ground cumin
2 teaspoons hot pepper sauce (e.g. Tabasco™)
1 teaspoon dried basil
1 teaspoon salt
1 teaspoon ground black pepper
1 teaspoon cayenne pepper
1 teaspoon paprika
1 teaspoon white sugar
1 (10.5 ounce) bag corn chips such as Fritos®
1 (8 ounce) package shredded Cheddar cheese

Directions:
1. Heat a large stock pot over medium-high heat. Crumble the ground chuck and sausage into the hot pan, and cook until evenly browned. Drain off excess grease.
2. Pour in the chili beans, spicy chili beans, diced tomatoes and tomato paste. Add the onion, celery, green and red bell peppers, chile peppers, bacon bits, bouillon, and beer. Season with chili powder, Worcestershire sauce, garlic, oregano, cumin, hot pepper sauce, basil, salt, pepper, cayenne, paprika, and sugar. Stir to blend, then cover and simmer over low heat for at least 2 hours, stirring occasionally.
3. After 2 hours, taste, and adjust salt, pepper, and chili powder if necessary. The longer the chili simmers, the better it will taste. Remove from heat and serve, or refrigerate, and serve the next day.
4. To serve, ladle into bowls, and top with corn chips and shredded Cheddar cheese.


post signature

Wednesday, August 1, 2012

Summer Recipes for You!

Hello August (where did you come from?!!?)

Anyway, I have TWO recipes for you!  

Derek and I grilled out on Sunday some pretty yummy food.  Thought I would share with you. 


Cilantro Lime Grilled Shrimp
Recipe here
Ingredients:
  • 1 lb. shrimp, peeled and deveined
  • 3 Tbsp. chopped fresh cilantro
  • 1 Tbsp. olive oil
  • 1 Tbsp. brown sugar
  • 1 tsp. cumin
  • 1/2 tsp. chipotle powder
  • 1 lime, juice and zest
Method:
1. Mix the chipotle powder, cumin, brown sugar, lime zest, lime juice and cilantro in a bowl and and let marinate for 20 minutes.
2. Skewer the shrimp.
3. Oil up the grill and grill the shrimp until cooked (pink and opaque), about 2-3 minutes per side.

These were so yummy!  Such great flavors.  And the perfect summer protein; not too heavy but still filling!


Southwest Quinoa Salad
Recipe here
Ingredients
Salad:
2 cups cooked, cooled quinoa (1 cup raw will equal about 2 cups cooked)
1 (15 oz.) can black beans, rinsed and drained
1 cup frozen corn, thawed
1/2 cup chopped red bell pepper
1/4 cup chopped red onion
1-2 cloves garlic, minced
1 small jalapeno, seeded and finely chopped
1/3 cup chopped fresh cilantro

Dressing:
1/4 cup red wine vinegar
1/4 cup olive oil
1/2 teaspoon salt
1/4 teaspoon pepper
1/2 teaspoon red pepper flakes
1/2 teaspoon cumin
1 teaspoon chili powder
1 teaspoon oregano
Juice of one lime


Directions
Combine the ingredients for the salad in a medium bowl and toss together.  In a small bowl, whisk together the dressing ingredients.  Pour over salad and mix well.  Chill for at least 2 hours before serving.


If you couldn’t tell, I was craving some spicy flavors.  This was the PERFECT addition to the cilantro & lime shrimp.  Again, very great summer dish because of the lightness of this salad.  However, the flavors were out of this world.  Delicious!


post signature

Wednesday, July 11, 2012

Banana Bread Cupcakes

Ok, real quick, before I get to the recipe, I have a couple of random thoughts for you:
  1. I had a big mac AND an Oreo Mcflurry from McDonald's today!!  Ok, so maybe I had the big mac WRAP and the snack sized mcflurry, which is like 2 hot bites….anyway, it was glorious!!
  2. Ahh, can Real Housewives of New Jersey & New York be any more boring…blah
  3. Lastly, I REALLY need a good book suggestion if anybody has one!

Ok, now on to the recipe…….


Ok, first, let me tell you, I did not make these.  However, they were at Derek’s family get together and they were ahhhh-mazing!

Seriously so good!

The recipe is from Down home with the Neely’s.  They were more banana-bready…than just banana cupcakes.  Try them; you will be impressed!

You can find the original recipe here. 


Gina’s Banana Cupcakes

Ingredients

Batter:
  • 1 cup all-purpose flour
  • 1/2 teaspoon baking powder
  • 1/2 teaspoon baking soda
  • 1/4 teaspoon salt
  • 1 stick butter, softened
  • 1/2 cup sugar
  • 1/4 cup sour cream
  • 1 1/2 teaspoons vanilla extract
  • 2 large eggs
  • 2 large ripe bananas, peeled, and mashed
  • 1/2 cup chopped walnuts, (reserve some for garnish)
Molasses Frosting:
  • 2 tablespoons whole milk
  • 1 1/2 teaspoons vanilla extract
  • 2 tablespoons butter, softened
  • 4 ounces cream cheese, softened
  • 2 tablespoons molasses
  • 2 to 3 cups powdered sugar

Directions

Batter:
Preheat the oven to 350 degrees F. Line 1 (12-cup) muffin pan with paper cupcake liners.

In a medium bowl, combine the flour, baking powder, baking soda, and salt. Set aside.

In a large bowl, add the butter and the sugar. Beat with a hand-held mixer until combined. Add the sour cream and the vanilla extract. Slowly beat in the eggs, 1 at a time. Incorporate the dry mixture and wet mixtures together until thoroughly combined. Add the bananas and walnuts, being careful not to over mix.
 Using an ice cream scoop, fill each cupcake liner 3/4 way full. Bake in the preheated oven until the tops turn golden-brown and when a toothpick, inserted in the middle of the cupcake, comes out clean, about 20 minutes. Remove the cupcakes from the oven to a wire rack and let cool before frosting.

Frosting:
In a large bowl, add the butter and cream cheese. Beat together until incorporated. Add the molasses and mix well. Stir in the vanilla extract, milk and powdered sugar.

Heavily frost the cupcakes and garnish with reserved chopped walnuts.


post signature

Thursday, April 5, 2012

Chicken Pot Pie Cupcakes

Adapted recipe and image from here

Last week, I made these adorable and serious delicious chicken pot pie cupcakes!!  I loved that these were individual, did not take as long to cook, and did not take as long to cool as the normal potpies!  These little suckers packed all the punch of the normal pie.  I swear you won’t miss anything.  Yum!

Ingredients

  • 1 chicken breast, poached and diced
  • 1 (14.5 oz) can cream of chicken soup
  • 1 cup frozen mixed veggies
  • 1 cup shredded cheddar cheese
  • 1 Tbs Herbs De Provence
  • 1 tsp onion powder
  • 1 tsp garlic salt
  • 2 (10 oz) cans Pillsbury biscuits

Directions

  1. Preheat your oven to 400.
  2. In a large bowl, combine the cooked chicken, cream of chicken soup, frozen veggies, cheese, herbs and spices.
  3. Lightly grease a 12-cup muffin tin and place the Pillsbury biscuits into each cup, pressing into the bottom and up the sides.
  4. Evenly spoon the pot pie mixture into each biscuit cup. Slide into the oven and bake for about 15 minutes. Check at the 12 minute mark.
  5. Let rest for about 3 minutes and dig in!

My suggestions:
  • Use the flaky biscuits instead of the homestyle.  The flakiness of a traditional potpie is something that I sorta missed with these.
  • Completely your preference, but I suggest baking the biscuits 5-8 minutes before putting the filling in.  This gives your dough a chance to cook a bit more thoroughly.
Enjoy!


post signature

Thursday, February 23, 2012

Shopping Finds & Recipe!

I thought I would share my shopping goodies from this past weekend with all of you….just because I’m so excited!

Ok- so just like about everyone else, I had to get me some colored denim!  So, I ran out and bought some as fast as I could.  I ended up with red, which I think was a good color to ease into.  I hope to pair these babies with loose fitting stripped/chevron top.

Any other ideas what to pair the red skinnies with?


Red Skinny


Second, I already mentioned this outfit; however, I'm super excited to rock these white skinny jeans with a basic denim shirt.  I think it will be a great spring outfit!

For my beauty find, I picked up the DiorShow mascara.  I've wanted to try this for soooo long!  I've heard nothing but absolutely great things about it.  Maybe I'll have to do a review for any curious readers out there...


I tried searching for some great chunky jewelry, but really could not find any necklaces.  Any good suggestions of where to find some show-stopper pieces?  However, I did find a great bracelet and cuff at Forever 21.
Ok, so on to a SUPER simple but delicious recipe.  Even my husband loved it and he is really not a pasta lover.  This pasta has a great creamy red sauce!

Creamy Tuscan Ravioli

Original recipe found here.
Ingredients
  • 1 (20-oz.) package refrigerated four-cheese ravioli
  • 1 (16-oz.) 4-cheese or Alfredo rosa sauce
  • 2 tablespoons white wine
  • 2 medium-size fresh tomatoes, chopped
  • 1 tablespoon dried basil
  • 1/3 cup grated Parmesan cheese
Preparation
  1. Prepare pasta according to package directions.
  2. Meanwhile, pour sauce into a medium saucepan.
  3. Add wine, tomatoes, basil, and parmesan cheese.Stir wine mixture into saucepan. Cook over medium-low heat 15 minutes or until thoroughly heated.
  4. Toss with pasta


Photobucket